AUSCHWITZ-BIRKENAU
RETURNING FROM AUSCHWITZ TO KRAKÓW
The unassuming regional capital of Oświęcim (ohsh-VEENCH-im) was the site of one of humanity’s greatest crimes: the systematic murder of at least 1.1 million innocent people. From 1940 until 1945, Oświęcim was the home of Auschwitz, the biggest, most notorious concentration camp in the Nazi system. Today, Auschwitz is the most poignant memorial anywhere to the victims of the Holocaust.
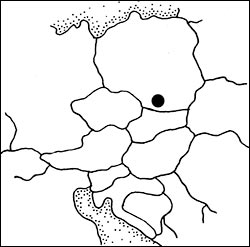
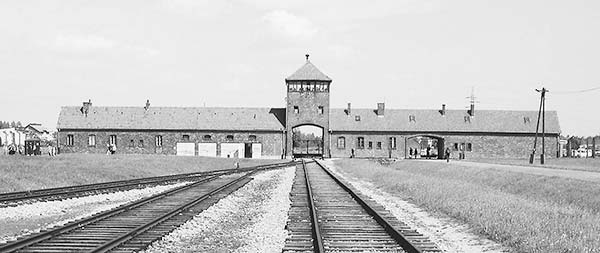
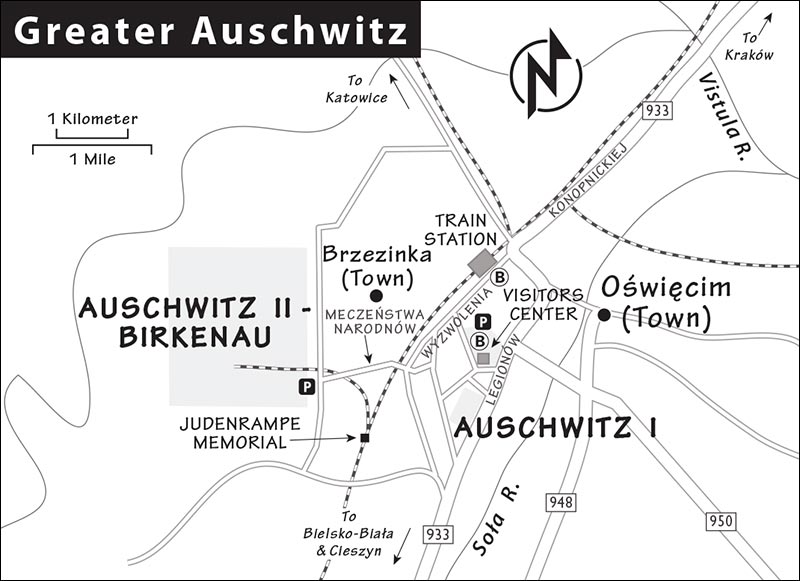
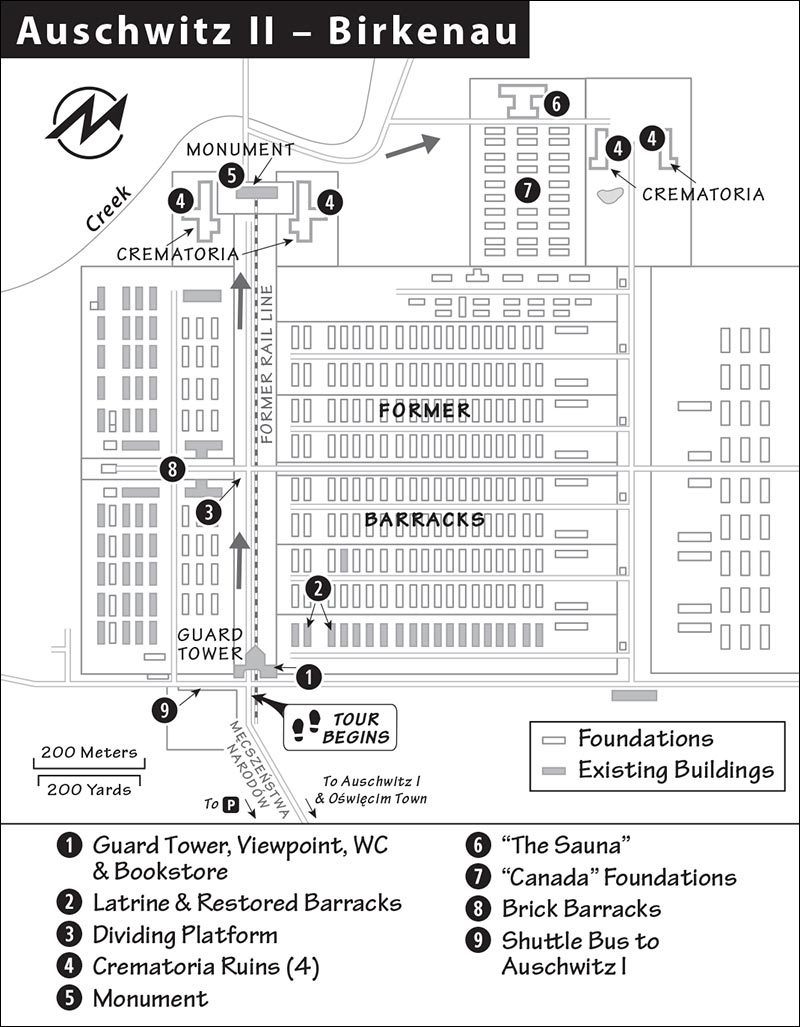
“Auschwitz” (OWSH-vits) actually refers to a series of several camps in German-occupied Poland—most importantly Auschwitz I, in the town of Oświęcim (50 miles west of Kraków), and Auschwitz II—Birkenau (about 1.5 miles west of Oświęcim). Visitors generally start with Auschwitz I, then ride a shuttle bus to Birkenau. Auschwitz I, where public transportation from Kraków arrives, has the main museum building, the Arbeit Macht Frei gate, and indoor museum exhibits in former prison buildings. Birkenau (BEER-keh-now), on a much bigger scale and mostly outdoors, has the infamous guard tower, a vast field with ruins of barracks, a few tourable barracks, the notorious “dividing platform,” a giant monument flanked by remains of destroyed crematoria, and a prisoner processing facility called “the Sauna.”
A visit here is obligatory for Polish 14-year-olds; students usually come again during their last year of school. And it’s an important pilgrimage for school groups from other countries. Many visitors leave flowers and messages; one message—from a German visitor—reads, “Nations who forget their own history are sentenced to live it again.”
GETTING THERE
To reach Auschwitz from Kraków, it’s easiest to join a package tour or hire a private guide or driver (1.5-hour drive each way). But the trip is also doable by train or bus (allow about 2 hours each way). For details, see “Auschwitz Connections,” at the end of this chapter.
Orientation to Auschwitz
Cost: Most of the time, you’re required to join a guided tour of Auschwitz I for 90 zł. (Alternatively, you could join a “study tour,” or hire your own guide—see the “Guided Tours at Auschwitz” sidebar.) At off-peak times (April-Sept after 16:00, March and Oct after 15:00, Feb after 14:00, Jan and Nov after 13:00, Dec after 12:00), the tour is not required—you are allowed to visit on your own for free, though donations are appreciated. For any visit, reservations are required to enter Auschwitz I (see later). Any time of year, Birkenau grounds can be toured without a guide.
Hours: The museum opens daily at 7:30. Closing times change with the season: June-Aug at 19:00, April-May and Sept at 18:00, March and Oct at 17:00, Feb at 16:00, Jan and Nov at 15:00, and Dec at 14:00. These are “last entry” times; the grounds at Auschwitz I stay open 1.5 hours later (though many buildings—including the national memorials—close promptly at these times). The grounds at Birkenau, where most groups end their visits, may stay open even later.
Information: +48 33 844 8100, www.auschwitz.org.
Why visit a notorious concentration camp on your vacation? Auschwitz-Birkenau is one of the most moving sights in Europe, and certainly the most important of all the Holocaust memorials. Seeing the camp can be difficult: Many visitors are overwhelmed by sadness and anger, as well as inspiration at the remarkable stories of survival. Auschwitz survivors and victims’ families want tourists to come here and experience the scale and the monstrosity of the place. In their minds, a steady flow of visitors will ensure that the Holocaust is always remembered—so nothing like it will ever happen again.
Auschwitz isn’t for everyone. But I’ve never met anyone who toured Auschwitz and regretted it. For many, it’s a profoundly life-altering experience—at the very least, it will forever affect the way you think about the Holocaust.
Mandatory Reservations: With well over one million visitors each year, Auschwitz struggles with crowds. Reservations are required—even if you’re visiting late in the day, on your own. Book as soon as your dates are set—ideally weeks in advance—at https://visit.auschwitz.org. Entrance slots for individuals typically become available 90 days before the date of visit (and can fill quickly, especially for May and June, when school groups crowd the site). These details can change—confirm on the website.
If an English tour isn’t available for your preferred date, consider booking one in a foreign language; once inside, you can use this chapter’s self-guided tour.
After you’ve booked your reservation, you’ll be sent a barcode; to get in, you’ll need both the barcode (on your phone) and an ID for each person in your group. (This system, while cumbersome, prevents scalpers from buying up tickets and reselling them at inflated prices.)
Last-Minute Options: I don’t recommend arriving in Kraków without an advance ticket. But if you do, there are a couple of last-minute options: You can book a day tour through a private company in Kraków, which includes both transportation and a tour of the camp (see the “Guided Tours at Auschwitz” sidebar). Or take your chances and just show up—a few tickets are reserved for same-day visitors. The visitors center opens at 7:30; typically, the later you arrive, the longer the wait. You can pass any wait time by first going to Birkenau, which has less strict timing requirements.
Getting from Auschwitz I to Birkenau: Buses shuttle visitors two miles between the camps (free, typically every 10-20 minutes, schedule posted at bus stops at each site, timed to correspond with tours). Taxis are also standing by (about 20-25 zł). Or you can walk the 30-40 minutes between the camps, which gives you a chance for reflection. Along the way, you’ll pass the Judenrampe, an old train car like the ones used to transport prisoners.
Services: The visitors center at Auschwitz I has an information desk, bookshops, baggage storage (large bags must be checked), and WCs. The guard tower at Birkenau has another bookshop and more WCs.
Eating: You’ll find eating options at the visitors center; additional choices are nearby.
Expect Changes: The Auschwitz museum is continually maintained and updated. Some things may be different than described here, but everything is well signposted.
Etiquette: The camp encourages visitors to remember that Auschwitz is the place where more than a million people lost their lives. Behave and dress here as you would at a cemetery. Photos are allowed inside some buildings, as posted.
Auschwitz Tour
Although most visitors will (and should) take a guided tour, the self-guided commentary below is worth reading before your visit to get your head around the history and the scope of what you’re about to experience. If you visit on your own without a tour, read the text ahead of time, then use it to guide you through the camp.
Regardless of how you arrive, you’ll begin at the new visitors center for Auschwitz I. This area can be crowded and chaotic; show your ticket, go through the security checkpoint, and get oriented. When ready, you’ll go through an underground tunnel and arrive at the main entrance building. This is where the tour begins. You’ll start with an eight-minute movie, which offers a concise history of the camp and sets the stage for what you’ll see.
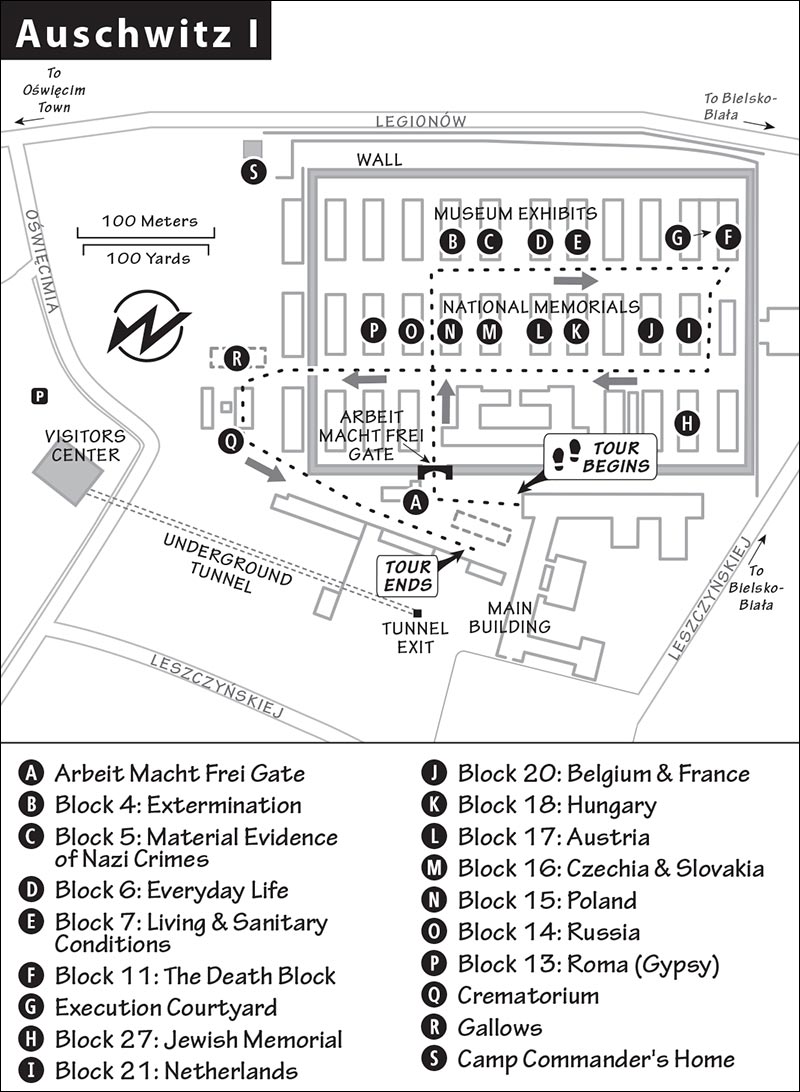
• To begin your visit, stand by the main building and look over the grassy field to get oriented.
AUSCHWITZ I
Before World War II, this camp was a base for the Polish army. When Hitler occupied Poland, he took over these barracks and turned the site into a concentration camp for his Polish political enemies. The location was ideal: The industrial city of Oświęcim was already an established rail junction, with good connections to Germany and the rest of Europe. (In fact, in the decades leading up to the war, tens of thousands of Polish families emigrating to North America came through Oświęcim.) Nearby rivers also provided natural protective boundaries.
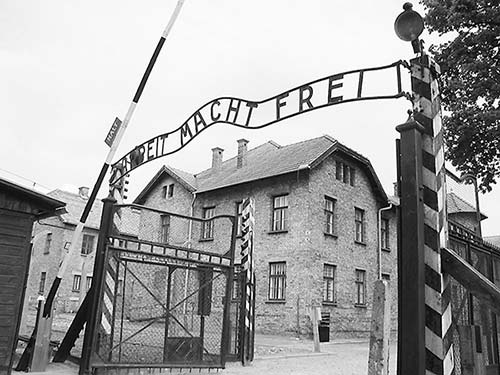
An average of 14,000 prisoners were kept at this camp at one time. (Birkenau could hold up to 100,000.) In 1942, Auschwitz became a death camp for the extermination of European Jews and others whom Hitler considered “undesirable.” By the time the camp was liberated in 1945, at least 1.1 million people had been murdered here—approximately 960,000 of them Jewish.
• Go closer to the camp entrance, approaching the notorious...
“Arbeit Macht Frei” Gate
Although this gate imparts the message “Work Sets You Free,” it’s cruelly ironic. The only way out of the camp for the prisoners was through the crematorium chimneys. Note that the “B” was welded on upside down by belligerent inmates, who were forced to make this sign (and much of the camp). The sign is a replica; the original was stolen one night in December 2009, then recovered two days later, cut up into several pieces. The original is now safely in the museum’s possession but no longer displayed.
Just inside the gate and to the right, the camp orchestra (made up of prisoners) used to play marches; having the prisoners march made them easier to count.
• From the gate, proceed straight up the “main street” of the camp.
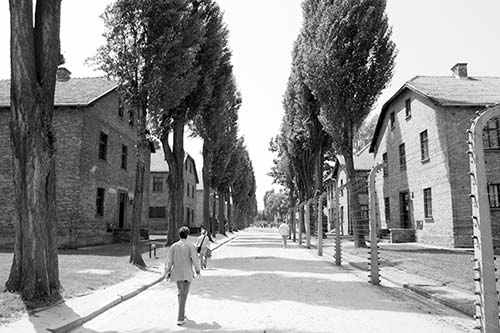
You’ll pass two rows of barracks. The first one holds a variety of national memorials. We’ll circle back here later, if you’d like to enter some of them. The second row of barracks holds the main museum exhibitions. Blocks 4 and 5 focus on how Auschwitz prisoners were killed. Blocks 6, 7, and 11 explore the conditions for prisoners who survived here a little longer than most. In each block, arrows guide you on a one-way route through the numbered rooms; in many cases, exhibits are both downstairs and upstairs—don’t miss these.
• Start with the third block you come to, on your right.
Block 4: Extermination
In Room 1, a map identifies the countries from which Auschwitz prisoners were brought—as far away as Norwegian fjords and Greek isles. In an alcove along the side of the room is an urn filled with ashes, a symbolic memorial to all the camp’s victims. At the end of the hall is a giant photo of arriving prisoners from Hungary.
Room 2 shows photographs of Jewish ghettos from all over Europe being “liquidated”—that is, the residents assembled and deported to various concentration camps. Thanks to its massive occupancy, Auschwitz was a destination for many.
Room 3 displays rare photos of scenes inside the camp. To prevent a riot, the Nazis claimed at first that this was only a transition camp for resettlement in Eastern Europe.
Upstairs in Room 4 is a model of a Birkenau crematorium. People entered on the left, then undressed in the underground rooms (hanging their belongings on numbered hooks and encouraged to remember their numbers to retrieve their clothes later). They then moved into the “showers” and were killed by Zyklon-B gas (hydrogen cyanide), a German-produced cleaning agent that is lethal in high doses. This efficient factory of murder took about 20 minutes to kill 8,000 people in four gas chambers. Elevators brought the bodies up to the crematorium. Members of the Sonderkommand—Jewish inmates who were kept isolated and forced by the Nazis to work here—removed the corpses’ gold teeth and shaved off their hair (to be sold) before putting the bodies in the ovens. It wasn’t unusual for a Sonderkommand worker to discover a wife, child, or parent among the dead. A few of these workers committed suicide by throwing themselves at electric fences; those who didn’t were systematically executed by the Nazis after a two-month shift. Across from the model of the crematorium are empty canisters of Zyklon-B.
Across the hall in the dimly lit Room 5 is one of the camp’s most powerful exhibits: a wall of actual victims’ hair—4,400 pounds of it. Also displayed is cloth made of the hair, used to make Nazi uniforms. The Nazis were nothing if not efficient...not even human body parts could be wasted.
Back downstairs in Room 6, you may see an exhibit on the plunder of victims’ personal belongings. People being transported here were encouraged to bring luggage—and some victims had even paid in advance for houses in their new homeland. After they were killed, everything of value was sorted and stored in warehouses that prisoners named “Canada” (after a country they associated with great wealth). Although the Canada warehouses were destroyed, you can see a few of these items in the next building.
• Head next door, to the left.
Block 5: Material Evidence of Nazi Crimes
The exhibits in this block consist mostly of piles of the victims’ goods, a tiny fraction of everything the Nazis stole. As you wander through the rooms, you’ll see eyeglasses, fine Jewish prayer shawls, crutches and prosthetic limbs (the first people the Nazis exterminated were mentally and physically ill German citizens), and a pile of pots and pans.
Then, upstairs, you’ll witness a seemingly endless mountain of shoes, children’s clothing, and suitcases with names of victims—many marked Kind, or “child.” Visitors often wonder if the suitcase with the name “Frank” belonged to Anne, one of the Holocaust’s most famous victims. After being discovered in Amsterdam by the Nazis, the Frank family was transported here to Auschwitz, where they were split up. Still, it’s unlikely this suitcase was theirs. Anne Frank and her sister Margot were sent to the Bergen-Belsen camp in northern Germany, where they died of typhus shortly before the war ended. Their father, Otto Frank, survived Auschwitz and was found barely alive by the Russians, who liberated the camp in January 1945.
• Cross over to the next block.
Block 6: Everyday Life
Although the purpose of Auschwitz was to murder its inmates, not all were killed immediately. After an initial evaluation, about 20 percent of prisoners were registered and forced to work. (This did not mean they were chosen to live—just to die later.) This block shows various aspects of daily existence at the camp.
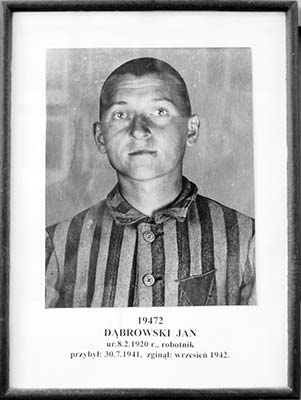
The halls are lined with photographs of victims, each identified with a name, birthdate, occupation, date of arrival at Auschwitz, date of death, and camp registration number. The dates reveal that these people survived here an average of two to three months. Similar photographs hang in several other museum buildings; as with the plundered items in the last block, keep in mind that these represent only a tiny fraction of the masses of people murdered at Auschwitz. In fact, most of the faces you see in these halls are non-Jewish Poles, who were among the early inmates at the camp. Later—when new arrivals were predominantly Jewish—photographing each prisoner became too expensive, so they were tattooed instead.
The room on the right displays drawings of the arrival process. One end of the room displays actual camp uniforms. After the initial selection, those chosen to work were showered, shaved, and photographed. Pictures show the tattoos used to register prisoners: on the chest, on the arm, or—for children—on the leg. A display shows the symbols that prisoners had to wear to show their reason for internment—Jew, Roma (Gypsy), homosexual, political prisoner, and so on.
Across the hall, Room 4 shows the starvation that took place here. The 7,500 survivors that the Red Army found when the camp was liberated were essentially living skeletons (the “healthier” inmates had been forced to march to Germany). Of those liberated, one-fifth died soon after of disease and starvation.
In Room 5, you can see scenes from the prisoner’s workday (sketched by survivors after liberation). Prisoners worked as long as the sun shone—8 hours in winter, up to 12 hours in summer—mostly on farms or in factories.
Another room is about Auschwitz’s child inmates, 20 percent of the camp’s victims. Blond, blue-eyed children were either “Germanized” in special schools or, if younger, adopted by German families. Dr. Josef Mengele conducted gruesome experiments here on children, especially twins and triplets, ostensibly to find ways to increase fertility for German mothers.
• Next up is...
Block 7: Living and Sanitary Conditions
Tours sometimes skip this block because it’s a bottleneck, and most of what you’ll see inside is similar to exhibits elsewhere in the camp. The focus is on the living conditions of prisoners held in these barracks—at first about 700 per building, and eventually up to 1,000. As you progress down the hall, you’ll see how conditions grew more and more unpleasant: At first, the floor was strewn with hay, or with straw-filled mattresses. Later, three-tiered bunk beds (with two or eventually three prisoners per bed) were crammed into each room. You’ll also see the washrooms (with trough-like sinks) and the latrines (with individual toilets—rather than the long, communal benches we’ll see later at Birkenau). The Block Elder’s Room showed how supervisors—selected from among the prisoners—had special privileges.
• Blocks 8-10 are vacant (medical experiments were carried out in Block 10). Block 11 was the most notorious of all.
Block 11: The Death Block
Head into the “Death Block” (#11), from which nobody ever left alive. Death here required a “trial”—but it was never a fair trial. Room 2 (on the left as you enter) is where these sham trials were held, lasting about two minutes each. In Rooms 4 and 5, you can see how prisoners lived in these barracks—more three-level bunks, with three prisoners sleeping in each bed (they had to sleep on their sides so they could fit). In Room 6, people undressed before they were executed.
In the basement, you’ll see several types of cells. In the Standing Cells (#22), four people would be forced to stand together for hours at a time (amid bricks that went all the way to the ceiling then). In the Dark Cell (#20), which held up to 30, there was only a small window for ventilation—and if it became covered with snow, the prisoners suffocated. The Starvation Cell (#18) held prisoners selected to starve to death when a fellow prisoner escaped; Maksymilian Kolbe spent two weeks here to save another man’s life (see sidebar on Kolbe). The basement is also where Nazi scientists carried out the first tests of Zyklon-B.
If the upstairs is open, you’ll find gallows and a bench used for administering lashes. Filling this floor are exhibits on various forms of punishment, mostly focusing on resistance within the camp, escapees, and local Poles who were executed—either for trying to assist the prisoners or for fighting with Nazi officers.
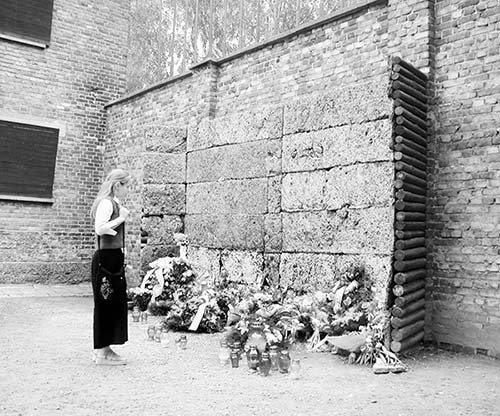
Finally, step into the walled-in courtyard between Blocks 10 and 11. The wall at the far end is where the Nazis shot several thousand political prisoners, leaders of camp resistance, and religious leaders. Notice that the windows are covered so that nobody could witness the executions. Also take a close look at the memorial—the back of it was made of a material designed by Nazis to catch the bullets without a ricochet. Inmates were shot at short range—about three feet. There are usually fresh flowers and other memorials placed at this poignant location.
• Leaving Block 11, proceed straight ahead, between the buildings, to the other row of barracks. Several of these blocks house...
National Memorials
These exhibits were created not by museum authorities but by representatives of the home countries of the camps’ victims. As these memorials overlap with the general exhibits and are designed for Europeans to learn more about the victims from their own homelands, most visitors skip this part of the site. On the other hand, while the main museum exhibits await renovation and modernization, the displays in these national memorials tend to be slicker and better-presented than the ones we just saw. As you walk along this street toward our next stop (the crematorium), consider stepping into the ones that interest you.
The first one you see is the memorial to Jewish victims (Block 27), and this powerful memorial may be the one most worth entering. The entryway displays the words SHOAH—Holocaust. A large room with black-and-white footage captures the joyful flowering of Jewish culture in the interwar period—when Europe and the Mediterranean basin had some 10.8 million Jews. Upstairs, clips of Hitler speeches spout the hateful propaganda that led to the Holocaust. The “Geography of Murder” room shows the locations of death camps and killing sites where Jews were murdered. You’ll watch eyewitness testimony from survivors and see art penciled on blank walls that was inspired by actual children’s art from concentration camps. The final room contains the gigantic Book of Names—individually listing each and every one of the nearly 6 million Jews murdered in the Holocaust. The book practically fills an entire room.
Most of the other national memorials are on the right side of the street. Across from the Jewish memorial, Block 21 honors Dutch Jews, including perhaps the most famous Dutch victim of the concentration camp, Anne Frank.
Block 20, a former hospital block, is shared by Belgium and France. A room near the entrance explains how some prisoners were killed by lethal injection, with portraits and biographical sketches of victims. Upstairs is the powerful Belgium exhibit, with a room featuring victims’ portraits. Block 18 holds a very modern, conceptual exhibit about Hungary’s victims, with an eerie heartbeat sound pervading the space; Block 17 memorializes victims from Austria. Across from this block, notice the long gallows used for mass hangings and the wooden guard booth where the SS took roll call. If someone was missing, the entire group had to stand at attention—perhaps for hours—until that person was located. Block 16 contains a well-presented exhibit about Czech and Slovak victims.
Block 15 honors victims from Poland, focusing on the 1939 Nazi invasion of the country, which resulted in the immediate internment of Polish political prisoners. Exhibits explain the process of “Germanization”—such as renaming Polish streets with German names—and (upstairs) the underground resistance that fought to get back some control over Poland.
Block 14 is the Russian national memorial. However, this one’s a bit controversial: While Russia claims to have lost “Russian” Jews to the Holocaust, virtually all of them were technically Polish Jews who had been living within Russia. (They spoke Polish, not Russian.) To sidestep the hot topic of how to identify these victims, this memorial focuses not on victims, but on the Russian liberation of the camp.
Block 13 houses the Roma (Gypsy) exhibit. You’ll learn that the Roma, along with the Jews, were considered no better than “rats, bedbugs, and fleas,” and explore elements of the so-called Zigeunerfrage—the “Gypsy question” about what to do with this “troublesome” population.
• At the end of this row of barracks, you reach a guard tower and a barbed-wire fence. Jog a few steps to the right, through the hole in the fence, then angle left toward the earthen mound with the giant, ominous brick chimney. Enter on the right side.
Crematorium
You’ll enter into the big “shower room.” Up to 700 people at a time could be gassed here. People undressed outside, or just inside the door. Look for the vents in the ceiling—this is where the SS men dropped the Zyklon-B.
In the adjacent room is a replica of the furnace. This facility could burn 340 bodies a day—so it took two days to burn all of the bodies from one round of executions. (The Nazis didn’t like this “inefficiency,” so they built four more huge crematoria at Birkenau.)
• Exiting the crematorium, you’re facing the main building where we began the tour. But first, circle around to the opposite side of the crematorium—near where you entered—for the closest thing this story has to a happy ending.
Shortly after the war, camp commander Rudolf Höss was tried, convicted, and sentenced to death. Survivors requested that he be executed at Auschwitz, and in 1947, he was hanged here. The gallows are preserved behind the crematorium, about a hundred yards from his home where his wife—who is said to have loved her years here—raised their children in a villa maintained by enslaved people and furnished with possessions of the dead.
• Take your time with Auschwitz I. When you’re ready, continue to the second stage of the camp—Birkenau.
AUSCHWITZ II—BIRKENAU
In 1941, realizing that the original Auschwitz camp was too small to meet their needs, the Nazis began a second camp in some nearby farm fields. The original plan was for a camp that could hold 200,000 people, but at its peak, Birkenau (Brzezinka) held about 100,000. They were still adding onto it when the camp was liberated in 1945.
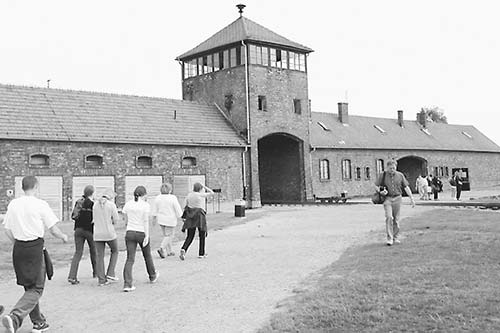
• Train tracks lead past the main building and into the camp. The first sight that greeted prisoners was the...
Guard Tower
If you’ve seen Schindler’s List, the sight of this icon of the Holocaust—shown in stirring scenes from the movie—may make you queasy.
Go through the gate to survey the camp: a vast field of chimneys and a few intact wooden and brick barracks. Some of the barracks were destroyed by Germans. Most were dismantled to be used for fuel and building materials shortly after the war. But the first row has been reconstructed (using components from the original structures). The train tracks lead straight back to the dividing platform, and then dead-end at the ruins of the crematorium and camp monument at the far side.
• Turn right (passing the WCs) and walk through the barbed-wire fence to reach the...
Wooden Barracks
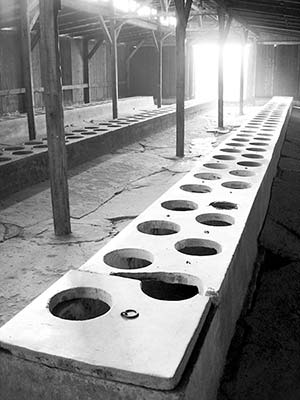
The first of these barrack buildings was the latrine: The front half of the building contained washrooms, and the back was a row of toilets. There was no running water, and prisoners were in charge of keeping the latrine clean. Because of the resulting unsanitary conditions and risk of disease, the Nazis were afraid to come in here—so the latrine became the heart of the black market and the inmates’ resistance movement.
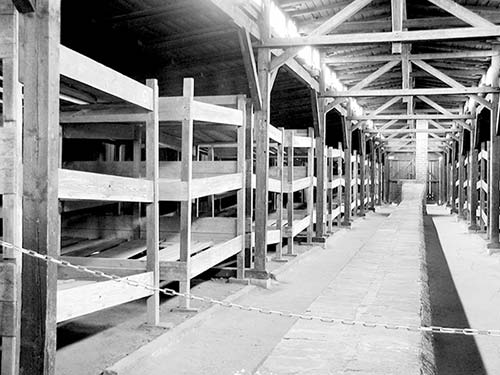
The third barrack was a bunkhouse. Each inmate had a personal number, a barrack number, and a bed number. Inside, you can see the bunks (angled so that more could fit). An average of 400 prisoners—but up to 1,000—would be housed in each of these buildings. These wooden structures, designed as stables by a German company to fit 51 horses (look for the horse-tying rings on the wall), came in prefab pieces that made them cheap and convenient. Two chimneys connected by a brick duct provided a little heat. The bricks were smoothed by inmates who sat here to catch a bit of warmth.
• Return to the train tracks and follow them toward the monument about a half-mile away, at the back end of Birkenau. At the intersection of these tracks and the perpendicular gravel road (halfway to the monument)—now marked by a lonely train car—was the gravel pitch known as the...
Dividing Platform
A Nazi doctor would stand facing the guard tower and evaluate each prisoner. If he pointed to the right, the prisoner was sentenced to death, and trudged—unknowingly—to the gas chamber. If he pointed to the left, the person would be registered and live a little longer. It was here that families from all over Europe were torn apart forever. (Photographs near the wooden building show the sad scene.)
Now carry on along the train tracks. As you walk on the camp’s only road, imagine the horror of this place—all the barracks packed with people, smoke billowing from the busy crematoria.
• At the end of the tracks, go 50 yards to the left and climb the three concrete steps to view the ruins of the...
Crematorium
This is one of four crematoria here at Birkenau, each with a capacity to cremate more than 4,400 people per day. At the far-right end of the ruins, see the stairs where people entered the rooms to undress. They were given numbered lockers, conning them into thinking they were coming back. (The Nazis didn’t want a panic.) Then they piled into the “shower room”—the underground passage branching away from the memorial—and were killed. Their bodies were burned in the crematorium (on the left), giving off a scent of sweet almonds (from the Zyklon-B). Beyond the remains of the crematorium is a hole—once a gray lake where tons of ashes were dumped. This efficient factory of death was destroyed by the Nazis as the Red Army approached, leaving the haunting ruins you see today.
When the Soviets arrived on January 27, 1945, the nightmare of Auschwitz-Birkenau was over. The Polish parliament voted to turn these grounds into a museum so that the world would understand, and never forget, the horror of what happened here.
• At the back of the camp stands the...
Monument
Built in 1967 by the communist government in its heavy “Socialist Realist” style, this monument represents gravestones and the chimney of a crematorium. The plaques, written in each of the languages spoken by camp victims (including English, far right), explain that the memorial is “a cry of despair and a warning to humanity.”
• With more time, you could continue deeper into the...
Rest of the Camp
There’s much more to see for those who are interested—Birkenau sprawls for a frightening distance. One worthwhile extension is the reception and disinfection building that prisoners called “the Sauna” (the long building with four tall chimneys). It was here that prisoners would be forced to strip and be deloused; their belongings were seized and taken to the “Canada” warehouses (described earlier) to be sorted. Walking through here (on glass floors designed to protect the original structure below), you’ll see artifacts of the grim efficiency with which prisoners were “processed”—their heads were shaved, they were tattooed with a serial number, and they were assigned uniforms and wooden clogs to wear. Portraits at the end of the building humanize those who passed through here. Look for the cart, which was used to dispose of ashes.
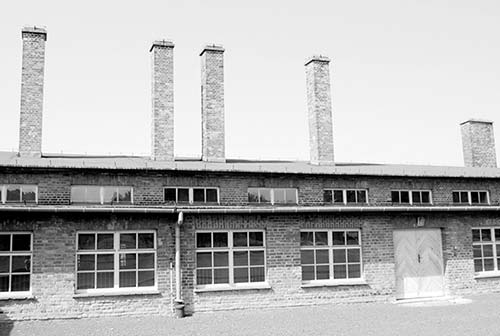
In front of the Sauna is a field of foundations of the “Canada” warehouses. Nearby are the other two destroyed crematoria.
• On your way back out of the camp, consider detouring to the right to look inside one of the...
Brick Barracks
Enter one of these buildings. The supervisors lived in the two smaller rooms near the door. Farther in, most barracks still have the wooden bunks that held about 700 people per building. Four or five people slept on each bunk; the floor was reserved for new arrivals. There were chamber pots at either end of the building. After a Nazi doctor died of typhus, sanitation improved, and these barracks got running water.
Auschwitz Connections
The Auschwitz Museum is in the town of Oświęcim, about 50 miles west of Kraków. The drive takes around 1.5 hours, depending on traffic. By public transit, it’s about 2 to 2.5 hours each way, including travel time to and from the bus or train station.
FROM KRAKÓW TO AUSCHWITZ
The easiest way to reach Auschwitz is with a package tour or private guide or driver; both of these options are described on here.
If you’re using public transportation, here are your choices (each option costs around 20 zł):
The most comfortable public transit option is to take a public bus (hourly, 1.5 hours, get current schedule at any Kraków TI, buses depart from Kraków’s main bus station behind the train station, run by Lajkonik). Look for buses to “Oświęcim” (not necessarily “Auschwitz”). Note that these buses can be full, and there’s no way to reserve a seat—line up early (generally about 15 minutes ahead). Be sure the driver knows you’re heading to the Muzeum. Once in Oświęcim, buses stop first at the train station, then continue on to the museum’s visitors center.
Your other option is to ride the train to Oświęcim (about 4/day direct, 2 hours), but be aware that it takes about 20-25 minutes to walk from the train station to the camp/visitors center. Instead, you can take a taxi (likely around 20 zł).
RETURNING FROM AUSCHWITZ TO KRAKÓW
Upon arrival at Auschwitz I, plan your departure by visiting the information desk. They can give you a schedule of departures and explain where the bus leaves from. If you intend to stay late into the afternoon, make a point of figuring out the last bus or train back to Kraków. Plan accordingly, and remember to allow enough time to make it from Birkenau back to Auschwitz I to catch your ride.